Online Book Checkout is Here!

Library books are back. Campbell Commons is pleased to announce the return of book check out. We love our Sora ebooks and audiobooks, but we’ve missed real, hold-them-in-your-hands-and-smell-the-paper library books. We bet you have too! Of course, we want to keep you safe, so we’ll make the whole process as contact-free as possible. Here’s how it will work:

Online Book Checkout

Step 1: Go to our online form and give us a good email address to contact you.

Step 2: Go to the Destiny library catalog and place a hold on the book to reserve it. (Placing a hold only takes a few seconds. It’s so easy, this video explains it all in less than 30 seconds.) You can reserve three books at a time to save trips.

Step 3: We’ll check the books out to you and contact you to arrange pickup at the email address you gave us in Step 1.

It’s really that easy!

Returning Library Books

You can return your library books at either of our book drops outside the library doors. We’ll either quarantine the books for 72 hours or zap them with our UV book sanitizer, or both. Returned books may still appear on your record for a few days after you turn them in, but this makes sure they are safe for the next reader.

More Information

Getting Started with Padlet Backpack

Dr. Walker has purchased Padlet Backpack, a school-wide Padlet licence for Campbell High! Here’s how to get started with your teacher account:

Logging In

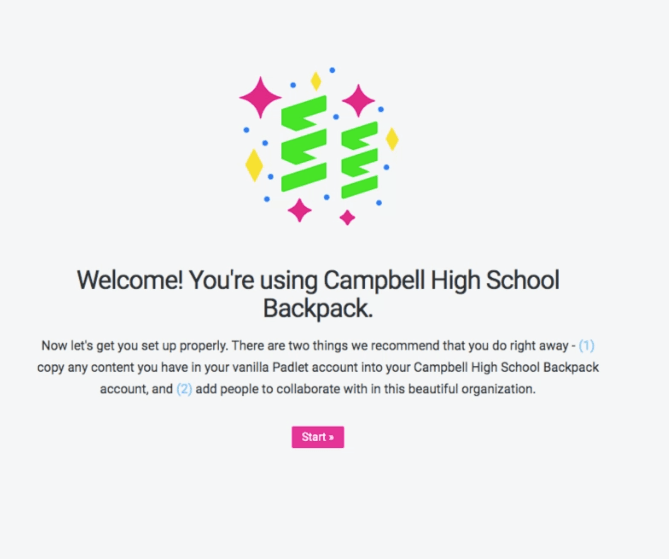
If you’re a teacher or paraprofessional, you should automatically be recognized as a teacher. You should see the welcome screen below.

If your account is not set up with teacher access, please contact [email protected].

Importing Content from Another Account

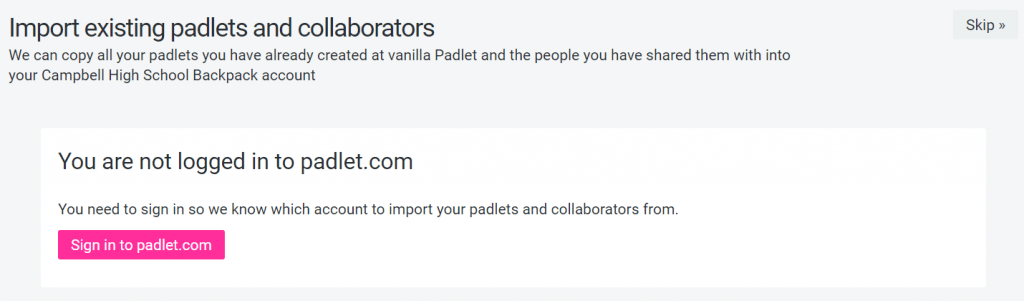
If you are an existing Padlet user, you will have the option to import your content from the other account.

If you are not already logged in to your previous padlet account, click Sign in to Padlet.com.

Import existing padlets and collaborators. Screen 1. Sign in to Padlet

Once you have logged in to your previous padlet account, select the items you want to bring in, then click the button to import.

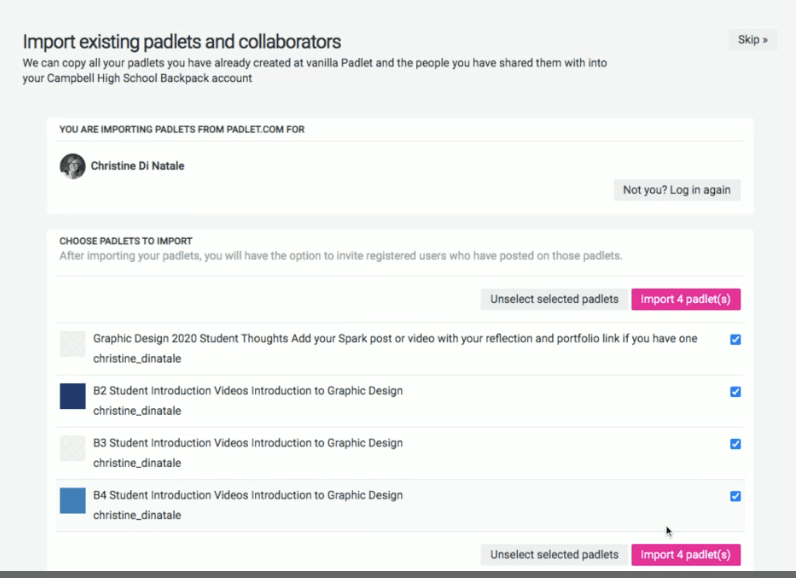
Important Note: This import does not move the padlet over from your basic account. It merely makes a (partial) copy of it. Some of the information from your padlets will not be imported, like the names of the contributors. If you are in the middle of using a padlet with a class, you may want to just keep going with the original copy and just create any new padlets under your new school account.

You can toggle between your basic account and school account using the links in the top left corner of the dashboard.

Adding Collaborators

If desired, you can add collaborators to your imported content.

If you are not prompted to do this automatically (or if you skip this step initially), just click on your avatar in the top right corner, then choose Import.

Student Logins

Students can also access Padlet using their Office 365 credentials using the same steps listed above.

Padlet Privacy Settings

When you share one of your padlets with a class, you have several options for how students are granted access:

Private (Invitation Only): For the most secure experience, keep your padlet set to Private, and invite your students one-by-one to be contributors. They must log in before contributing.

Secret: This makes the padlet available to anyone who has the link. If you choose this option, you’ll probably want to turn on “Require Approval” in the Content Filter settings to prevent “padlet bombing.”

Organization Wide: This option requires students to log in before contributing to your padlet. It doesn’t require you to invite them individually, but unfortunately, it broadcasts your padlet to the dashboard of every teacher and student in the school. If you choose this option, you’ll probably still want to turn on “Require Approval” in Content Filter.

Password: The same security as “secret,” just less convenient. Not only do you have to share/protect the link to your padlet, you also have to share/protect a password.

More Help

For more help using Padlet, try these resources:

Using Video in Online Instruction

Educational videos are a valuable instructional tool, especially in online instruction. There are a few important considerations to remember when using video clips in online classes.

Use Links When Possible

Whenever possible, provide students with links to view your videos directly on their own devices, rather than playing it through screen sharing in Zoom. This avoids a host of technical and copyright complications.

Consider making video clips an asynchronous part of your instruction, especially for longer clips.

Playing Clips through Zoom

When it is not possible or not practical to provide students with a way to view a video clip directly on their own devices, you can play a video for them from your computer over screen sharing. There are a few important settings that make this more successful. In the screen sharing selection menu:

  • Make sure “Share Computer Sound” is checked.
  • Make sure “Optimize Screen Sharing for Video Clip” is checked.
  • Share only the window that has your video, not the entire screen.
screen shot of zoom screen sharing menu showing recommended settings.
Click to enlarge image

Copyright Considerations

If you choose to show copyrighted commercial videos through screen sharing, there are a few important legal limitations. Here are a few of the most basic ones:

  • The teacher may only show “reasonable and limited portions” of a film. (Don’t show an entire documentary video.)
  • The video must be related to the curricular goals of the course.
  • The video must be legally acquired.
  • Teachers may not circumvent copyright protection measures to change the format of a video (e.g. ripping a DVD to a file).

The Copyright Act at §110(1) (face to face teaching exemption) allows for the performance or display of video or film in a classroom where instruction takes place in classroom with enrolled students physically present and the film is related to the curricular goals of the course. The TEACH Act amendment to the Copyright Act, codified at § 110(2), permits the performance of a reasonable and limited portion of films in an online classroom. Under the TEACH Act, there is the express limitation on quantity, and an entire film will rarely constitute a reasonable and limited portion. Instructors may also rely upon fair use for showing films in an online course, although showing an entire film online also may not constitute fair use. 

Copyright on Campus, University of Florida

More detail about the TEACH Act can be found in this summary from the American Library Association. If you need more information, please don’t hesitate to ask your library media specialist!

How to Take a Screenshot

There are lots of reasons you may want to capture an image of what’s on your device screen, including getting faster help from tech support. Here are instructions for the most common devices.

TIP: If you are capturing a screen shot to help get technical support, send the image of the full screen; don’t crop the image.

Windows

Press the PrtScn (Print Screen) key to copy a screen shot to the clipboard, then paste it into an email or document.

OR

Press the Windows logo key + Shift + S keys to open Snip & Sketch. Press the button closest to the X to take a full screen snip. [Detailed Instructions]

Mac

Press the Shift + Command + 3 keys. Click on the thumbnail to edit or wait for the image to save to your desktop. [Detailed Instructions]

Chromebook

Press the Ctrl + Show Windows keys. [Detailed Instructions]

iPad

Depending on the model, either press the Top button and the Home button at the same time, or press the Top button and the Volume Up button at the same time. [Detailed Instructions]

iPhone

Depending on the model, either press the Side button and the Volume Up button at the same time, or press the Side button and the Home button at the same time. [Detailed Instructions]

Android

Press the Power button and Volume down button at the same time for a few seconds. If this does not work, try pressing the Power button only for a few seconds. [Detailed Instructions]

Online Learning: Getting Tech Help for Students

The following is an overview of how tech help will be provided to students during CCSD online learning days.


CTLS Learn Login Help

  1. Instructions for finding login credentials and accessing the system are provided on our CTLS webpage: campbellcommons.com/CTLS
  2. If students need a password reset, they can request one here: campbellcommons.com/RESET
  3. Basic login troubleshooting steps and instructions for contacting the CCSD Help Desk are here: campbellcommons.com/CTLS#HELP

Campbellhigh.net Google Account Login Help

  1. Instructions for finding login credentials and accessing the system are provided on our G Suite for Education page: campbellcommons.com/GOOGLE
  2. If students need a password reset, they can request one here: campbellcommons.com/RESET
  3. To switch between personal and school Google accounts, follow the instructions here: http://www.campbellcommons.com/google/logging-in-to-multiple-google-accounts/

CCSD Laptop Tech Help

Families with CCSD-issued laptops can request technical support through the CCSD Help Desk.

Parent Support:

Student Support:

TIP: Receive much faster email support by including all of the following information:

  • Service Tag/serial number from the bottom of the laptop (required)
  • Student name and ID number
  • A full description of the problem
  • A full screen (uncropped) screen shot of the error (instructions).
    If you are NOT able to include a screen shot, be sure to also include:
    • Browser and version
    • Full URL where the error occurred
    • Exact error messages encountered and other text on the screen

An Evolving List of Tips for Teaching Online

Here are some things we have learned in “real time” as we adjust to teaching fully online. We’ll continue adding to this list as we learn.

General Tips

  • Connecting to the Cobb VPN slows down your connection. Don’t connect to the VPN unless you specifically need something like the academic portal that is only available through it.
  • If you need to scan a document at home, use the OneDrive app on your smartphone. You can scan documents directly into your OneDrive.

Google Classroom

  • If you create a bunch of assignments at once, use the Schedule option to pace them out over time. That way students aren’t overwhelmed.
  • Videos uploaded to Google Classroom take a while to process before they can be viewed. Instead of scheduling assignments with attached videos immediately, schedule them for at least an hour in the future. That way the video is fully processed and available before the students see the assignment.

Removing Google Accounts from Shared iPads

Google stores account credentials in two different ways on the iPad. To clear your Google accounts, you will need to follow both steps below.

Step 1: Sign Out of Google Branded Apps

  1. Open one of the Google apps (Drive, Classroom, Docs, etc.)
  2. Open the Settings menu and look for the account/sign-in section
  3. Click Manage accounts on this device
  4. For any accounts listed, click Remove from this device

Step 2: Sign Out of Safari

Google account credentials are stored separately for Safari and apps that use Safari to authenticate, such as Flipgrid. The steps below remove the Google credentials from Safari and, in turn, for non-Google apps that use “Log in With Google.”

Method 1: Through the Browser

  1. In Safari, go to https://accounts.google.com/Logout 
  2. Click Remove an account
  3. Click the X beside the account name
  4. Click Yes, remove
  5. Repeat steps 2-4 for each account

Method 2: Through the Settings

  1. Open the iOS Settings app
  2. In the left menu, scroll down and click on Safari
  3. Navigate to Advanced > Website data
  4. Click Edit and delete the data for Google.com and any other relevant sites

Students: Back Up your files to Google Drive!

Student network storage (also known as your “H: drive,” your “home directory,” or just your “number”) is erased each summer!  Be sure to back up any files you wish to keep. One simple way to do this is to save all your files to your Campbellhigh.net Google drive. (Did you know you have unlimited cloud storage through this account?)  You can back up your files in three easy steps:

  1. On a school computer, open http:\\drive.google.com  and log in with your Campbellhigh.net Google Account.
  2. In Google Drive, click New, then click Folder Upload.Folder Upload menu
  3. Select your network drive (Look under “Computer” and find your student ID number.), then click OK.

That’s it! You should see your files being uploaded to Google Drive! If you have any problems, ask the Campbell Commons staff for help.